
Soil Moisture sensor with Arduino in Tinkercad | how to use soil moisture sensor in Tinkercad

  Soil Moisture sensor with Arduino in Tinkercad | how to use soil moisture sensor in Tinkercad Circuit diagram: Arduino Sketch: // C++ code // int moisture_data = 0; void setup() {   pinMode(A0, INPUT);   Serial.begin(9600);   pinMode(12, OUTPUT);   pinMode(6, OUTPUT); } void loop() {   moisture_data = analogRead(A0);   Serial.println(moisture_data);   if (moisture_data < 21) {     digitalWrite(12, HIGH);     digitalWrite(6, HIGH);   } else {     digitalWrite(12, LOW);     digitalWrite(6, LOW);   }   delay(10); // Delay a little bit to improve simulation performance }

Traffic light model using an Arduino in Tinkercad


Traffic light model using an Arduino in Tinkercad

This simple small project uses an Arduino and some LEDs to duplicate a traffic light. working model It uses code as an inside timer and continues to run until we cut the Arduino's power supply.


working :

It works exactly he same way like real life traffic LED lights. in our model first we turn on the RED LED and turn it off after 1 sec we can increase the time of  on and off  of the LED time in coding. same way the two LED's that is Yellow and Green works. 

Components Needed:


Crcuit diagram:


Connection:

Red LED connected to the  Arduino pin -13

Yellow LED connected to the Arduino pin -12

Green LED connected  to the Arduino pin -11

all the ground pin of LED's connected to the ground of an Aduino.


Program: (Block based)


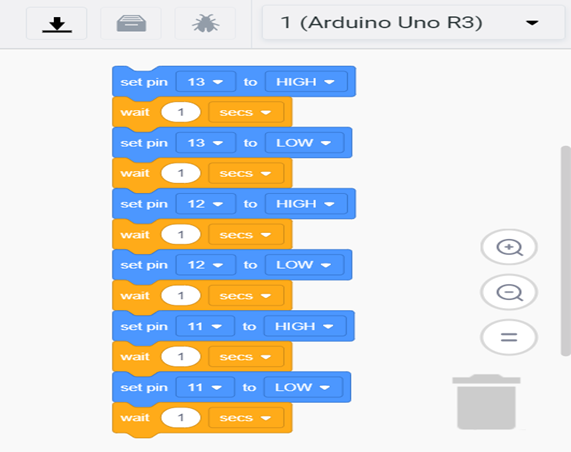
Program: (Arduino Sketch)

void setup()

{

  pinMode(13, OUTPUT);//declared as a output

  pinMode(12, OUTPUT);

  pinMode(11, OUTPUT);

}


void loop()

{

  digitalWrite(13, HIGH);

  delay(1000); // Wait for 1000 millisecond(s)

  digitalWrite(13, LOW);

  delay(1000); // Wait for 1000 millisecond(s)

  digitalWrite(12, HIGH);

  delay(1000); // Wait for 1000 millisecond(s)

  digitalWrite(12, LOW);

  delay(1000); // Wait for 1000 millisecond(s)

  digitalWrite(11, HIGH);

  delay(1000); // Wait for 1000 millisecond(s)

  digitalWrite(11, LOW);

  delay(1000); // Wait for 1000 millisecond(s)

}


Working Video:


Like share and comment :

                                                     Our FaceBook Page                                                           


For Any queries please contact:

impulseTech101@gmail.com


Comments

Popular posts from this blog

Soil Moisture sensor with Arduino in Tinkercad | how to use soil moisture sensor in Tinkercad

  Soil Moisture sensor with Arduino in Tinkercad | how to use soil moisture sensor in Tinkercad Circuit diagram: Arduino Sketch: // C++ code // int moisture_data = 0; void setup() {   pinMode(A0, INPUT);   Serial.begin(9600);   pinMode(12, OUTPUT);   pinMode(6, OUTPUT); } void loop() {   moisture_data = analogRead(A0);   Serial.println(moisture_data);   if (moisture_data < 21) {     digitalWrite(12, HIGH);     digitalWrite(6, HIGH);   } else {     digitalWrite(12, LOW);     digitalWrite(6, LOW);   }   delay(10); // Delay a little bit to improve simulation performance }

Getting Started with the Arduino IoT Cloud using Esp32 & DHT-11

  Getting Started with the Arduino IoT Cloud using Esp32 Introduction: The Internet of Things has given rise to plenty of exciting new projects for makers. It's both interesting and practical to be able to develop remote sensors and gadgets. Allowing IoT devices from multiple manufacturers to interact with your innovations will open up a lot of possibilities, including some you might not have considered before. In this getting started guide of Arduino IOT cloud we will learn about how to use Arduino IOT cloud with Esp32 board. Arduino IOT cloud What is Arduino IOT cloud? Arduino IoT Cloud is a web-based service that allows users to create connected devices quickly, easily, and securely. Multiple devices can be linked together and data can be exchanged in real-time. Users can also able to monitor the data using a simple user interface from anywhere. one can also use the android application for monitoring and controlling the devices. Because Arduin...

Interfacing of TMP36 Temperature Sensor with an Arduino in Tinkerad.

  Interfacing of TMP36 Temperature Sensor with an Arduino in Tinkerad. This project will turn the Arduino into a thermometer! By using the tmp36 temperature sensor. We can able to measure our body temperature and turn on the 3 LEDs. Green LED indicates the low-temperature range, Yellow LED indicates the medium temperature range and Red LED indicates the high-temperature range. One can test the circuit starting the simulation, clicking on the sensor, then adjusting its temperature value using the slider, and can test the desired resulting LED patterns. For making the actual circuit, you need to use the Arduino, breadboard, USB cable, male-female jumper wires, three LEDs, three resistors (any value from 100-1K, 220 ohms), a TMP36 sensor,   Circuit Diagram:   Components Required: §   Arduino UNO §   TMP36 (Temperature sensor) §   Resistor-03 §   LED – Green §   LED – Yellow § ...